This minty butter slime recipe is soft, buttery, and oddly relaxing to make. Follow easy steps, try fun variations, and avoid common slime mistakes.
A Small Surprise, A Big Memory
It was my last day before leaving for the city. I tried to act normal, but inside, I was full of emotions. Leaving my friends, my home, and my daily life felt harder than I expected.
Just when I thought I would leave quietly, I saw my friends waiting outside. They had come early in the morning just to see me one last time.
One of them handed me a small chocolate. Another said, “Don’t forget us when you become successful.” We laughed, but our eyes were full of tears.
That small surprise meant more than any big gift ever could.
That day I learned — true friendship doesn’t end with distance. It only grows stronger in the heart.
Introduction – Why This Minty Butter Slime Recipe Feels Different
So Minty Butter Slime Recipe.
If you’ve never touched it before, you’re missing out.
It’s not sticky like regular slime.
Not bouncy like clear slime.
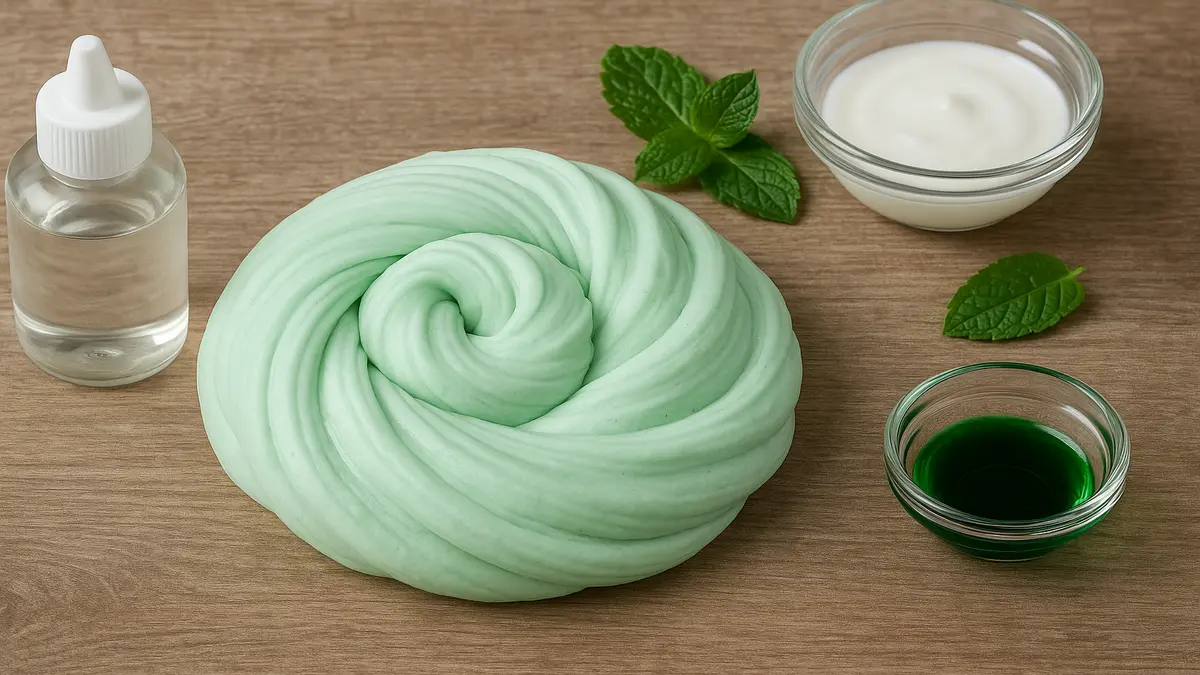
It’s… smooth, spreadable, clay-like. Almost like soft butter at room temp. Sounds weird but — yeah. That’s exactly it.
Now add mint to it.
That cool, fresh smell hits your nose and suddenly the whole thing feels relaxing. Almost spa-like. I know it sounds dramatic for slime, but honestly… It works.
I make this when I want something calming but still fun. Kids love it. Adults secretly love it more.
Equipment You’ll Need (Nothing Fancy)
You don’t need a kitchen full of tools. Just basics.
- 1 large mixing bowl (plastic or glass)
- Measuring spoons
- Spatula or spoon
- Airtight container (very important, trust me)
- Clean hands — yes, hands count as equipment
That’s it. If you can mix pancake batter, you can do this.
Ingredients List (Simple & Easy to Find)
Again — not edible, please don’t taste.
- White school glue – 1 cup
- Soft air-dry clay – about ½ cup (this is the “butter” part)
- Contact lens solution – 1 to 2 tablespoons (with boric acid)
- Baking soda – ½ teaspoon
- Mint-scented fragrance oil – 5 to 8 drops
- Green food coloring – optional, 1–2 drops
- Hand lotion – a pea-sized amount (optional but nice)
Sounds simple. It is. Just don’t rush it.
Step-by-Step Method (Slow… Calm… No Panic)
Step 1: Start With the Glue
Pour your white glue into the bowl.
Pause for a second.
This is the base of everything. If you rush here, the texture later feels off.
Add baking soda. Stir gently. Not aggressively. We’re not angry at the glue.
Step 2: Add the Minty Smell
Now the fun part.
Add mint fragrance oil — start with 5 drops.
Smell it.
Want more? Add one or two more. Don’t overdo it or it’ll smell like toothpaste on steroids.
Optional: Add green food coloring. One drop goes a long way. Pastel green looks nicest, honestly.
Step 3: Activate the Slime
Slowly add contact lens solution.
I mean slowly. Like… half a tablespoon at a time.
Stir.
Watch it pull away from the bowl.
If it’s sticky, add a few drops more. Don’t panic and dump everything in.
This part feels magical every time.
Step 4: Butter Time (My Favorite Part)
Take your soft air-dry clay.
Flatten it slightly.
Press it into the slime.
Fold. Stretch. Squish.
At first it looks messy. Wrong, even.
Keep going.
After a minute or two — boom.
Butter slime texture unlocked.
Step 5: Final Touch
Rub a tiny bit of hand lotion on your hands. Knead the slime once more.
This step is optional… but wow, it makes a difference. Softer. Smoother. Less sticking.
Texture Check – Did You Get It Right?
Your minty butter slime should:
- Stretch slowly without tearing
- Spread like soft butter on a table
- Not stick to fingers
- Smell fresh, not overpowering
If it’s too sticky → add 2–3 drops contact solution
If it’s too stiff → knead with warm hands or add lotion
Slime is forgiving. Unlike baking
serving (play) suggestions for Minty Butter Slime Recipe
Reminder: This is NOT edible. Keep away from small kids & pets.
Presentation Ideas
- Store in a clear jar to show off the minty green color
- Add fake mint leaf charms or glitter on top
- Label it like a dessert jar: “Mint Butter Whip”
How to Enjoy Playing With It
- Stretch it slowly for that soft butter texture
- Fold and swirl to create a mint cream look
- Try poking bubbles for satisfying pops
- Use a straw to make air bubbles inside
Fun Occasions
- Great for DIY slime parties
- Cute as a return gift in small containers
- Perfect for stress relief or desk play
Fun Variations to Try (Because Why Not)
Once you nail the base recipe, play around.
Chocolate Mint Slime
Add a tiny bit of brown coloring + mint scent. Looks like mint chocolate chip. Do NOT eat. Please.
Glitter Mint Slime
Add fine silver or green glitter. Subtle sparkle works best.
Peppermint Swirl
Make white slime + green slime separately. Twist together. Very satisfying.
Extra-Fluffy Butter Slime
Mix in a bit of shaving foam before adding clay. Softer, lighter feel.
Health & Safety Benefits (Yes, There Are Some)
Okay, it’s not food.
But it’s not useless either.
Stress Relief
Stretching and folding slime helps calm the mind. Sounds silly — works amazingly.
Sensory Development
Great for kids. Texture, smell, pressure… all stimulating in a good way.
Fine Motor Skills
Rolling, kneading, pinching — it helps finger strength.
Screen-Free Time
Honestly, this alone makes it worth it.
Important:
Always supervise kids.
Wash hands after playing.
Store slime sealed.
Nutrition Section (Quick but Honest)
Let’s not fake it.
This slime has ZERO nutritional value.
No calories.
No vitamins.
No protein.
And again — not edible.
I’m including this section only because food blogs usually have it… and because clarity matters.
Minty Butter Slime Recipe
Ingredients
Equipment
Method
- Pour your white glue into the bowl.
- Pause for a second.
- This is the base of everything. If you rush here, the texture later feels off.
- Add baking soda. Stir gently. Not aggressively. We’re not angry at the glue.
- Now the fun part.
- Add mint fragrance oil — start with 5 drops.
- Smell it.
- Want more? Add one or two more. Don’t overdo it or it’ll smell like toothpaste on steroids.
- Optional: Add green food coloring. One drop goes a long way. Pastel green looks nicest, honestly.
- Slowly add contact lens solution.
- I mean slowly. Like… half a tablespoon at a time.
- Stir.
- Watch it pull away from the bowl.
- If it’s sticky, add a few drops more. Don’t panic and dump everything in.
- This part feels magical every time.
- Take your soft air-dry clay.
- Flatten it slightly.
- Press it into the slime.
- Fold. Stretch. Squish.
- At first it looks messy. Wrong, even.
- Keep going.
- After a minute or two — boom.
- Butter slime texture unlocked.
- Rub a tiny bit of hand lotion on your hands. Knead the slime once more.
- This step is optional… but wow, it makes a difference. Softer. Smoother. Less sticking.
- Your minty butter slime should:
- Stretch slowly without tearing
- Spread like soft butter on a table
- Not stick to fingers
- Smell fresh, not overpowering
- If it’s too sticky → add 2–3 drops contact solution
- If it’s too stiff → knead with warm hands or add lotion
- Slime is forgiving. Unlike baking
Storage Tips for Minty Butter Slime Recipe(Learn From My Mistakes)
- Store in an airtight container
- Keep away from heat and sunlight
- If it dries slightly, knead with lotion
- Shelf life: 2–3 weeks if stored well
If it smells weird or grows mold — throw it away. No second chances.
Common Mistakes for Minty Butter Slime Recipe
- Adding too much activator at once
- Using hard clay (won’t blend well)
- Over-scenting the slime
- Leaving it uncovered overnight
Slime likes patience. That’s the secret.
Related Recipes
- Texas Roadhouse Italian Dressing Recipe
- Smoked Chicken Rub Recipe
- Father of the Brine Recipe
- Smoked Chicken Rub
FAQs-Minty Butter Slime Recipe
1. Is Minty Butter Slime Recipe edible?
No. Absolutely not. It is a sensory craft only.
2. Can kids make this Minty Butter Slime Recipe?
Yes, with adult supervision. Especially during the activator step.
3. Why is my Minty Butter Slime Recipe too sticky?
You likely need a few more drops of contact lens solution. Add slowly.
4. Can I skip the clay?
You can, but then it won’t be butter slime. Clay is essential.
5. How long does it last?
Around 2–3 weeks if stored properly.
6. Can I use essential oil instead of fragrance oil?
Yes, but use very little. Essential oils are strong.
7. What if my slime becomes hard?
Warm it with your hands and knead with a bit of lotion.
Final Thoughts for Minty Butter Slime Recipe
Minty butter slime Recipe isn’t just slime.
It’s one of those small projects that slow you down.
Make you focus.
Make your hands busy and your brain quiet.
I didn’t expect to enjoy it this much the first time.
Sounds weird but… I did.
So yeah.
Try it.
Mess up once or twice.
Laugh at the texture.
Fix it.
That’s half the fun.